Once you have created a landcover classification in ENVI you may wish to view or work with these data in ArcGIS. If you include a file extension of “.DAT” as part of the filename you can open this file directly in ArcGIS. For example, you can open the file MyClass.dat in ArcGIS and you will see the classified image with the colors that you have specified.
You need to be aware that this is an 8-bit raster image and does not have the attributes of a vector image in ArcGIS, i.e. you cannot use this for zonal statistics, selection by attribute (class), or clipping and buffering other data. To perform any of these GIS functions you will need to convert the ENVI raster file to an ArcGIS shapefile.
When you use the ENVI Classification Workflow the last step has an option to Export Classification Vectors directly to a shapefile. While this is easy to do; generally we need to perform many classifications, modifying the training regions along the way. Also you may want to perform post classification steps such as combining classes. For these reasons, it is generally better to NOT export the classes at this stage of your analysis.
Once you have performed your image classification(s) and assessed the accuracy of your work, there is a simple two-step process that you can use to convert the final classified raster data into a vector file structure that can be used in ArcGIS. Be advised that this could be a time consuming process on large images with many class polygons.
Export to Vector:
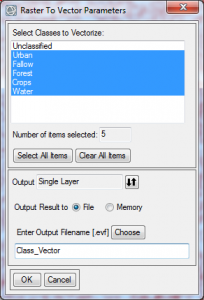 From the ENVI Toolbox select Classification | Post Classification | Classification to Vector. Select your classified image and click OK to open the Raster To Vector Parameters dialog. You have several options within this dialog; you can select all classes or some subset of them, you can save all of the data to a single layer file or save each class as a separate layer.
Typically you will select all classes into a single layer file. Make sure you do not select the default class “Unclassified” or a class labeled “Masked pixels” (created if you applied a mask to your image). Direct the Output to a Single Layer, enter a new filename such as Class_Vector, and click OK. This creates an ENVI vector file with the file extension “. EVF” When opened in the Layer Manager or Data Manager this will display the name RTV(your original classified file name).
Export to Shapefile:
Using the Toolbox select: Vector | Classic EVF to Shapefile. Select the EVF file from the previous step, enter an appropriate filename for the new shapefile, and click OK. ENVI will append the ‘.SHP” file extension to your filename. It may take some time to complete the export, be patient.
Once this is complete, add this shapefile to a map in ArcGIS. Open the Layer Properties and under the Symbology tab select Categories | Unique Values then click on the button Add All Values to display the separate classes. ArcGIS will use the ENVI class names but will use its own color scheme. You can easily change the individual colors and labels here or in the Table of Contents pane.